Microsoft recently announced retirement of Docker container runtime from their Azure Kubernetes Services (AKS) platform. If you have been managing any such AKS, you might have received such a notification from Microsoft.
On 1 May 2023, Docker container runtime will be retired. Please transition to containerd by that date. After docker container runtime is retired, you may remain on existing deployed instances but scaling operations will fail, node pool creation will fail, and you will be out of support.
I know this article seems a bit delayed, but some of you might still be struggling to fix your Sitecore containers after this change.
Problem Statement
Microsoft recommends to upgrade your existing windows server node pools, which are used by Sitecore, to containerd in order to continue working optimally and remain supported. This article from Microsoft contains the script to perform the upgrade.
az aks nodepool upgrade \
    --resource-group myResourceGroup \
    --cluster-name myAKSCluster \
    --name npwd \
    --kubernetes-version 1.24.9 \
    --aks-custom-headers WindowsContainerRuntime=containerd
At the first instance, it looks really simple to perform the upgrade. However, one little “Note” in that article points out that – “When running the upgrade command, the --kubernetes-version specified must be a higher version than the node pool’s current version.“
So essentially it involves upgrading the Kubernetes version as well, which might require some more considerations. Anyway, the core of this specific problem, if you run this upgrade, you would notice that some of the containers will not start anymore with a generic error like – “Error: failed to start containerd task “solr”: hcs::System::CreateProcess solr: The system cannot find the file specified.: unknown“.
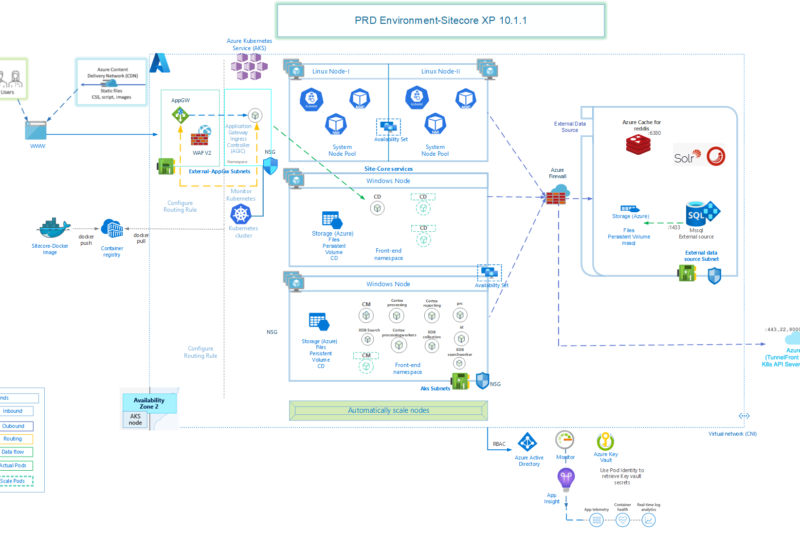
If you look into your node pools from Azure, you would see this is how windows nodes look like before this upgrade.
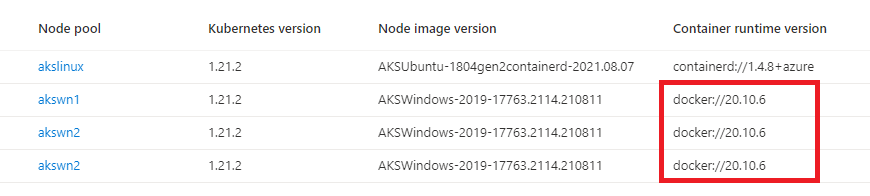
So, we need to do something to ensure that our Kubernetes version gets upgraded along with Windows node pools to use containerd and all the Sitecore containers get into running status.
Impacted Sitecore Environments
Depending upon your Sitecore environment, you may not have encountered this issue. Even though other containers are likely to get impacted, my experience shows that it mainly impacts the environments where SOLR and SQL are also running inside AKS.
Because when AKS gets upgraded, all data in SQL gets removed, so we need to redeploy SQL and SOLR and run the sql-init and solr-init again. So, in most case this would be your development or test environments, as it’s not supported to have Solr and Sql running inside AKS in production environments.
And that’s where the problem lies – those init jobs will fail until we do the required changes.
How to go about it
Now that we have established the problem, let’s see what can be done to take care of it. Your quick google search will already show you a nicely written article, which provides a good way forward. However, it assumes that people already have access to Dockerfile of those sql-init & solr-init images. Since those images do not contain the Dockerfile used to create the images, it might be challenging to get it right.
Essentially, we need to build custom images for sql-init and solr-init, with the required changes, and deploy those to the impacted environment(s).
Create Custom SQL-Init Image
The steps are really easy, if you already have a local docker environment running.
- Create a folder and put a new file named “Dockerfile” in that folder
- Add first line as – “FROM scr.sitecore.com/sxp/sitecore-xp1-mssql-init:10.1.1-ltsc2019” without double quotes
- Next line as this article suggests – “
ENTRYPOINT ["powershell.exe", ".\\StartInit.ps1", "-ResourcesDirectory $env:RESOURCES_PATH", "-SqlServer $env:SQL_SERVER", "-SqlAdminUser $env:SQL_ADMIN_LOGIN", "-SqlAdminPassword $env:SQL_ADMIN_PASSWORD", "-SitecoreAdminUsername $env:SITECORE_ADMIN_USERNAME", "-SitecoreAdminPassword $env:sitecore_admin_password", "-SitecoreUserPassword $env:SITECORE_USER_PASSWORD", "-SqlElasticPoolName $env:SQL_ELASTIC_POOL_NAME", "-DatabasesToDeploy $env:DATABASES_TO_DEPLOY", "-PostDeploymentWaitPeriod $env:POST_DEPLOYMENT_WAIT_PERIOD", `"-DatabaseUsers @(...)@]
But here is the problem – This is NOT the complete content of the Dockerfile. It assumes that you already had created a Dockerfile for sql-init image previously, so that can just be modified. Also, it’s not clear what goes under the section “-DatabaseUsers @(...)@“. In most case for vanilla Sitecore installations, just getting sql-init image from Sitecore registry works fine and in that case you wouldn’t have access to the actual content of Dockerfile.
So, how to find that out. Turns out there is a hack!
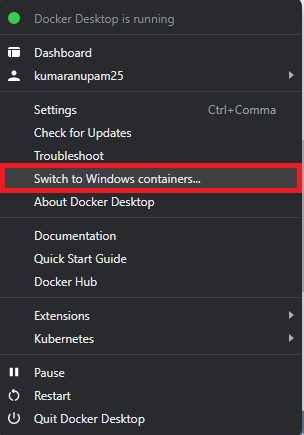
- First, ensure that Docker desktop is running in Windows Container mode. If not, switch to windows container.
- Pull the sql-init image from Sitecore registry to your local docker using docker pull. I was using 10.1.1 version, so this is how the command will look like. In this case, I am using version 10.1.1-ltsc2019, provide the tag based on version in your environment
docker pull scr.sitecore.com/sxp/sitecore-xp1-mssql-init:10.1.1-ltsc2019- Next, we need to find out the Image ID, you can use “docker images” command for the same

- Once we have the image ID, we can look for the history. We can use the “
docker history” command to view the layers that were used to create a Docker image. Each layer in the image corresponds to a step in the Dockerfile that was used to build it
docker history --no-trunc 8fc95b14c949- And the result will contain something like this. It’s a bit unreadable in the screenshot here, but the point is it contains the original instructions in the Dockerfile and gives us the remaining parameters with values to complete the command.

- This is how the final Dockerfile for sql-init looks like
FROM scr.sitecore.com/sxp/sitecore-xp1-mssql-init:10.1.1-ltsc2019
ENTRYPOINT ["powershell.exe", ".\\StartInit.ps1", "-ResourcesDirectory $env:RESOURCES_PATH -SqlServer $env:SQL_SERVER -SqlAdminUser $env:SQL_ADMIN_LOGIN -SqlAdminPassword $env:SQL_ADMIN_PASSWORD -SitecoreAdminPassword $env:sitecore_admin_password -SqlElasticPoolName $env:SQL_ELASTIC_POOL_NAME -DatabasesToDeploy $env:DATABASES_TO_DEPLOY     -DatabaseUsers @(     @{'databaseName' = 'Sitecore.Master'; 'username' = $env:Master_Database_Username; 'password' = $env:Master_Database_Password},     @{'databaseName' = 'Sitecore.Core'; 'username' = $env:Core_Database_Username; 'password' = $env:Core_Database_Password},     @{'databaseName' = 'Sitecore.Web'; 'username' = $env:Web_Database_Username; 'password' = $env:Web_Database_Password},     @{'databaseName' = 'Sitecore.Experienceforms'; 'username' = $env:Forms_Database_Username; 'password' = $env:Forms_Database_Password},     @{'databaseName' = 'Sitecore.Exm.master'; 'username' = $env:Exm_Master_Database_Username; 'password' = $env:Exm_Master_Database_Password},     @{'databaseName' = 'Sitecore.Marketingautomation'; 'username' = $env:Marketing_Automation_Database_Username; 'password' = $env:Marketing_Automation_Database_Password},     @{'databaseName' = 'Sitecore.Messaging'; 'username' = $env:Messaging_Database_Username; 'password' = $env:Messaging_Database_Password },     @{'databaseName' = 'Sitecore.Reporting'; 'username' = $env:Reporting_Database_Username; 'password' = $env:Reporting_Database_Password },     @{'databaseName' = 'Sitecore.Referencedata'; 'username' = $env:Reference_Data_Database_Username; 'password' = $env:Reference_Data_Database_Password },     @{'databaseName' = 'Sitecore.Processing.Pools'; 'username' = $env:Processing_Pools_Database_Username; 'password' = $env:Processing_Pools_Database_Password },     @{'databaseName' = 'Sitecore.Processing.Tasks'; 'username' = $env:Processing_Tasks_Database_Username; 'password' = $env:Processing_Tasks_Database_Password },     @{'databaseName' = 'Sitecore.Processing.Engine.Tasks'; 'username' = $env:Processing_Engine_Tasks_Database_Username; 'password' = $env:Processing_Engine_Tasks_Database_Password },     @{'databaseName' = 'Sitecore.Processing.Engine.Storage'; 'username' = $env:Processing_Engine_Storage_Database_Username; 'password' = $env:Processing_Engine_Storage_Database_Password },     @{'databaseName' = 'Sitecore.Xdb.Collection.ShardMapManager'; 'username' = $env:Collection_ShardMapManager_Database_Username; 'password' = $env:Collection_ShardMapManager_Database_Password },     @{'databaseName' = 'Sitecore.Xdb.Collection.Shard0'; 'username' = $env:Collection_ShardMapManager_Database_Username; 'password' = $env:Collection_ShardMapManager_Database_Password },     @{'databaseName' = 'Sitecore.Xdb.Collection.Shard1'; 'username' = $env:Collection_ShardMapManager_Database_Username; 'password' = $env:Collection_ShardMapManager_Database_Password })"]
And that’s it for sql-init. Save the file and build a new image.
docker build -t sitecore-xp1-mssql-init-custom:10.1.1-ltsc2019 .Run the above command from inside the folder where the Dockerfile is kept. Notice the “.” at the end, that refers to local directory. If everything goes well, you should have a new image created in your local environment. You can now, push this to your remote container registry and deploy to AKS as usual.
Create Custom Solr-Init Image
Now that we have sql-init figured out, lets move our focus on custom Solr-init image. This is even easier to create, since this article contains the full command required to be used in the Dockerfile.
We just need to repeat the process explained above for Solr-Init.
- Create a folder and put a new file named “DockerFile” in that folder
- Add first line as – “FROM scr.sitecore.com/sxp/sitecore-xp1-solr-init:10.1.1-ltsc2019” without starting and ending double quotes
- Add the following lines next – “ENTRYPOINT [“powershell.exe”, “.\\Start.ps1”, “-SitecoreSolrConnectionString $env:SITECORE_SOLR_CONNECTION_STRING -SolrCorePrefix $env:SOLR_CORE_PREFIX_NAME -SolrSitecoreConfigsetSuffixName $env:SOLR_SITECORE_CONFIGSET_SUFFIX_NAME -SolrReplicationFactor $env:SOLR_REPLICATION_FACTOR -SolrNumberOfShards $env:SOLR_NUMBER_OF_SHARDS -SolrMaxShardsPerNodes $env:SOLR_MAX_SHARDS_NUMBER_PER_NODES -SolrXdbSchemaFile .\\data\\schema.json -SolrCollectionsToDeploy $env:SOLR_COLLECTIONS_TO_DEPLOY”]” without starting and ending double quotes
- Since, this file doesn’t have any missing parameters, we don’t need to look into the history like we did for sql-init. This is how the final Dockerfile for solr-init looks like
FROM scr.sitecore.com/sxp/sitecore-xp1-solr-init:10.1.1-ltsc2019
ENTRYPOINT ["powershell.exe", ".\\Start.ps1", "-SitecoreSolrConnectionString $env:SITECORE_SOLR_CONNECTION_STRING -SolrCorePrefix $env:SOLR_CORE_PREFIX_NAME -SolrSitecoreConfigsetSuffixName $env:SOLR_SITECORE_CONFIGSET_SUFFIX_NAME -SolrReplicationFactor $env:SOLR_REPLICATION_FACTOR -SolrNumberOfShards $env:SOLR_NUMBER_OF_SHARDS -SolrMaxShardsPerNodes $env:SOLR_MAX_SHARDS_NUMBER_PER_NODES -SolrXdbSchemaFile .\\data\\schema.json -SolrCollectionsToDeploy $env:SOLR_COLLECTIONS_TO_DEPLOY"]
And that’s it for solr-init. Save the file and build a new image.
docker build -t sitecore-xp1-solr-init-custom:10.1.1-ltsc2019 .Like Sql-Init, run the above command from inside the folder where the Dockerfile is kept. Notice the “.” at the end, that refers to local directory. If everything goes well, you should have a new image created in your local environment.
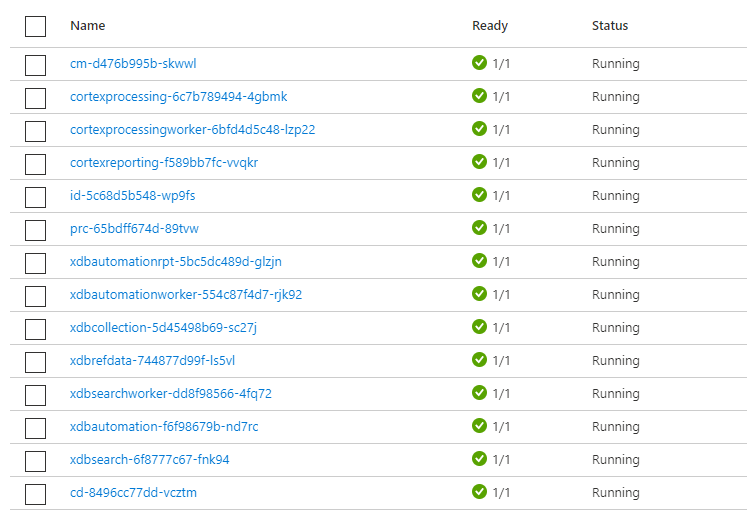
You can now, push this to your remote container registry and deploy to AKS as usual. You may have to redeploy SQL and SOLR Images before running the new init jobs. If everything goes as expected

And now you have your Sitecore environment upgraded and Windows nodes running with Containerd runtime.

Hope this helps.
Enjoy,
Anupam