This is the second article of the series Sitecore Production Environment on Azure Kubernetes Services – Series in which I intend to explain the External Data Sources Setup related to Sitecore deployment on Azure Kubernetes Services. If you want to know more about other Azure Components, check out the Part 1 of this series.
Problem Statement
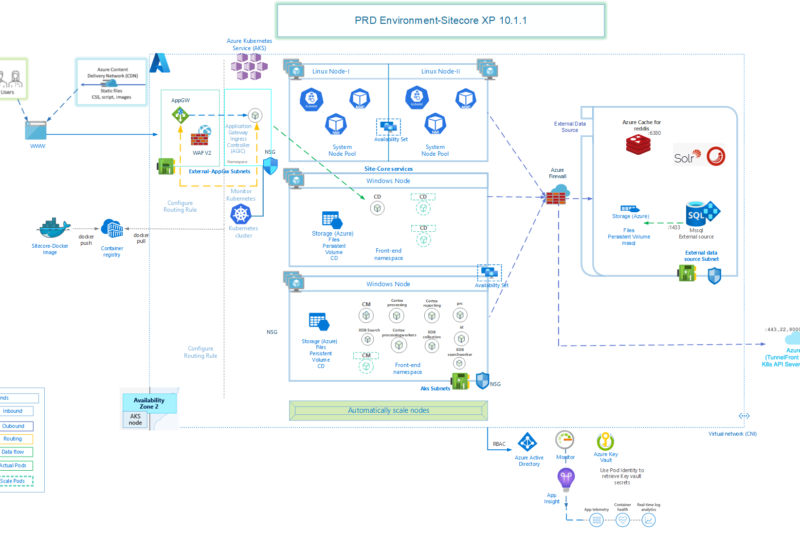
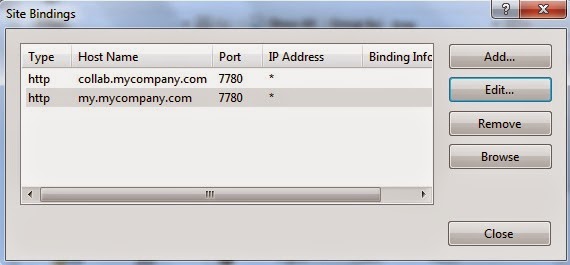
In this article, lets focus on all the External Data Sources that are relevant for a production environment of Sitecore on AKS. Of course your environment may look like a bit different based on your target design, but even in that case, most of these components will still be relevant.
As per Sitecore official documentation, deploying external data sources – SQL, Solr and Redis within AKS cluster is NOT supported. So, we need to deploy these outside the AKS Cluster and configure AKS cluster to be able to communicate with them.
Solution Design
In the production environment, we are going to deploy these services.
- Azure SQL with Elastic Pool
- Azure Cache for Redis
- Solr 8.4.0 with zookeeper 3.5.7 running on Azure VMs
Azure SQL with Elastic Pool
This is actually one of the easier ones. As per Microsoft official documentation – “Azure SQL Database elastic pools are a simple, cost-effective solution for managing and scaling multiple databases that have varying and unpredictable usage demands”. This fits our requirements really well. When Sitecore gets deployed, it creates a number of databases, but not all databases require same about of backend resources. since the databases in an elastic pool are on a single server and share a set number of resources, this makes it an obvious choice.
There are various examples of how to create Azure SQL . You can use template from here.
After Creating Azure SQL with Elastic Pool, we need a couple of configuration for it to be able to connect from AKS.
- Under Virtual Network, add Microsoft.Sql Service endpoint in AksSubnet
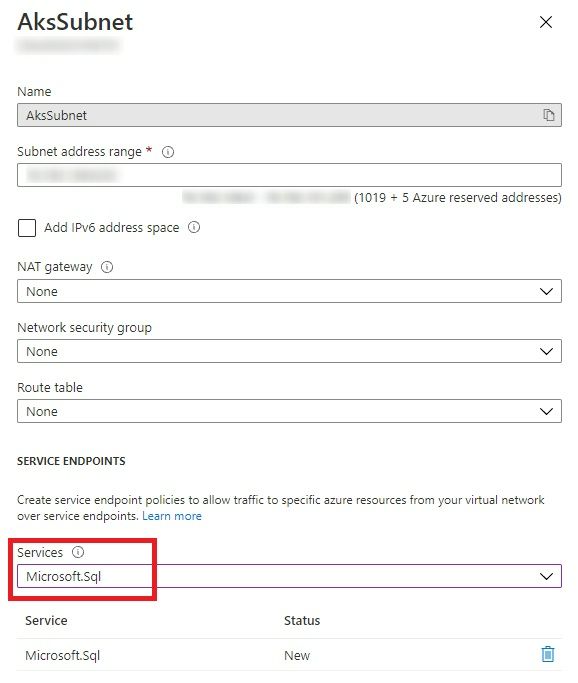
- Under Azure SQL Firewalls and Virtual Network, allow access from AksSubnet. Also, you should add the Client IP address shown on this page as an allow rule, so that you can connect to SQL databased from within the Azure portal to check the connectivity.
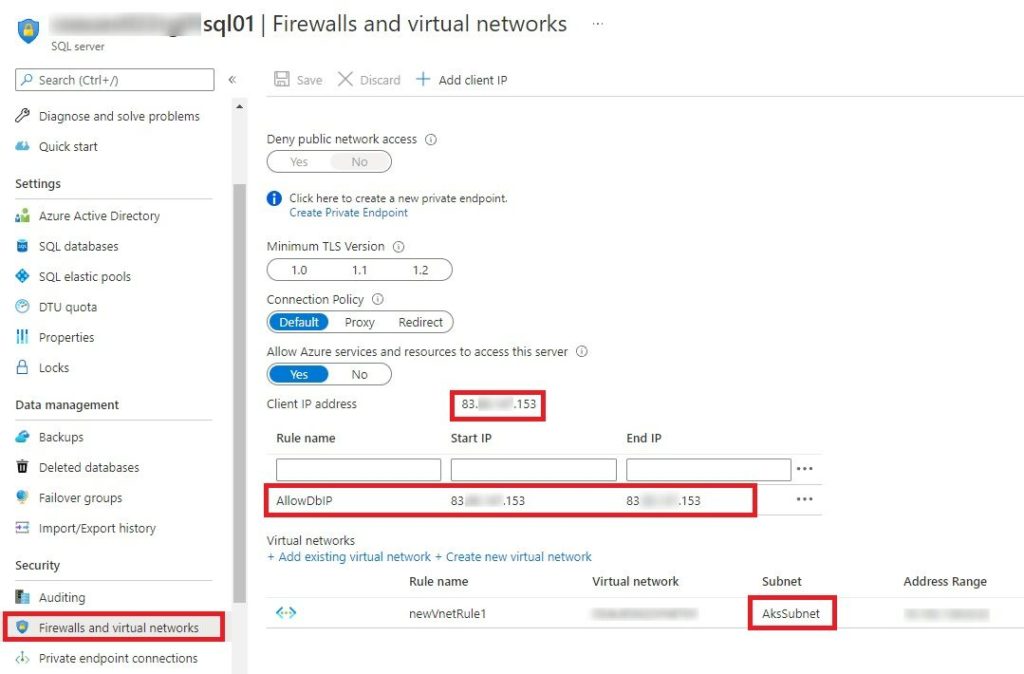
AksSubnet is the subnet which is used by AKS Cluster.
Azure Cache for Redis
Azure Cache for Redis is the default session provider that Sitecore uses as a means of managing out of process/distributed session state to share contact data across browser sessions and devices.
There are various examples of how to create Azure Cache for Redis. You can use template from here.
In Production environment, you may want to use the premium price tier, which also provides the feature of associating the cache to a subnet, making it more secure. If not, you can use the Private endpoint to secure it.
The ARM template example link given above doesn’t include linking with VNET. But you can add the following lines in your template file to make it happen.
In the Deploy.json, add the additional parameters, create a variable named subnetId and add the after resource’s properties.
<other parameters...>

   "existingVirtualNetworkResourceGroupName": {
      "type": "string",
      "defaultValue": "[resourceGroup().name]",
      "metadata": {
        "description": "The resource group of the existing Virtual Network."
      }
    },
    "existingVirtualNetworkName": {
      "type": "string",
      "metadata": {
        "description": "The name of the existing Virtual Network."
      }
    },
    "existingSubnetName": {
      "type": "string",
      "metadata": {
        "description": "The name of the existing subnet."
      }
    },
<End of parameters declaration...>

 "variables": {
    "subnetId": "[resourceId(parameters('existingVirtualNetworkResourceGroupName'),'Microsoft.Network/virtualNetworks/subnets', parameters('existingVirtualNetworkName'), parameters('existingSubnetName'))]"
  },

  "resources": [
    {
      "apiVersion": "2019-07-01",
      "name": "[parameters('redisCacheName')]",
      "type": "Microsoft.Cache/Redis",
      "location": "[parameters('location')]",
      "properties": {
        "enableNonSslPort": "[parameters('enableNonSslPort')]",
        "sku": {
          "capacity": "[parameters('redisCacheCapacity')]",
          "family": "P",
          "name": "Premium"
        },
        "subnetId": "[variables('subnetId')]"
      }
You need to update the Redis connection string in cd.yaml file. Rob has explained it pretty well what to do here in his article under section “Fixing the hard-coded Redis connection”.
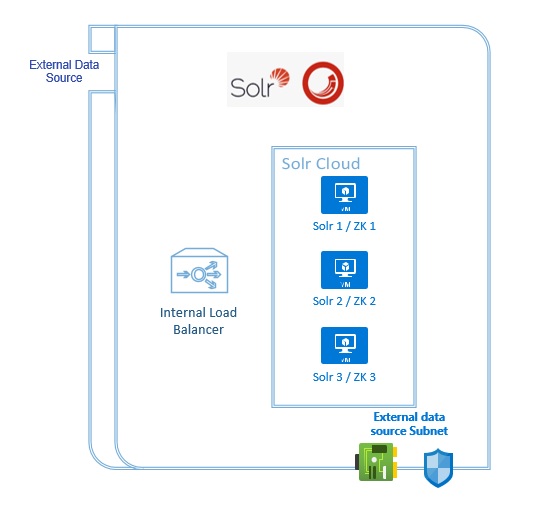
Solr Cluster on Azure VMs
Setting up Solr for this production setup came out of be one of the most time consuming piece of all for me. The example Rob provides in his article is for setting up Solr on a single VM. That works great, well almost, because of zookeeper link provided in his article doesn’t seem to work anymore and that took some time for me to figure out. But also because it’s a production environment and having a single VM doesn’t provide any high-availability.
So, after comparing pros and cons of various high availability related configurations, I came up with a 3 VM setup running Solr 8.4.0 along with Zookeeper 3.5.7 on the same servers. That should provide enough high availability and performance for the purpose. The recommended setup of having Solr and Zookeeper running on separate servers would have required 5-6 VMs, that’s was considered too expensive and unnecessary for this deployment.
Now, these version numbers are extremely important because it seems when running in Solr Cloud mode, version 8.4.0 doesn’t support Zookeeper 3.6.2 and if you upgrade Solr to a later version, that’s not supported by Sitecore! As you can imagine, I found that out real hard way.
I have uploaded the final scripts in a github repository. It was super tricky to even verify if all the installations went correctly as the VMs run Linux and remote desktop was not enabled! Anyway, the script has the following parts:
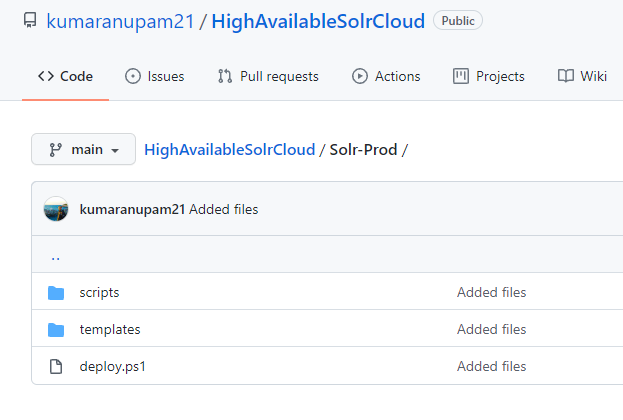
- Deploy.ps1: This is the entry point of the script. You need to call this script with all the required parameters. This will create a storage account in Azure, upload the ARM template files and the InstallSolr.sh bash script which is used internally from within the ARM template, so needs to be accessible from within it.
- SolrDeploy-PROD.json: This is the main deploy template. This creates an Availability set with 3 VMs, Network security group, NIC for each VM and attached storage. Once infra components are created and ready, it deploys Solr as an extension by executing the InstallSolr.sh script
- Solr-Parameters-PROD.json: Nothing special, this includes the various configurable parameters that SolrDeploy-PROD.json file expects
- InstallSolr.sh: This bash script inside scripts folder actually downloads and installs Solr and Zookeeper on all the VMs and runs those as a service.
If you are able to execute successfully till here, you would have a 3 VM Solr Cloud running in your environment. But in order to access it from Sitecore, we need to put an Internal Azure Load Balancer before it.
I have added 2 more files in the same github project under templates.
- SolrLBDeploy-PROD.json: This deploy file creates all the necessary components and configurations for the Load Balancer like the Load balancer, backend pools, listeners, probe etc.
- SolrLB-Parameters-PROD.json: This includes the various configurable parameters that SolrLBDeploy-PROD.json file expects
If everything goes well, you should have your Load Balancer up and running and connected to the 3 VMs. You should now use the URL of the Load Balancer to connect to the Solr Instances.
Let me know if you run into any issues deploying it as it’s practically difficult to pen down all the different issues I encountered during the setup along with their fixes. But I would still highlight a few points:
- When you run deploy.ps1, if anything goes wrong, it will return the error as “No Parameter for ServerName found”. This is because that’s written under exception condition and it’s not exactly the error. It just means, that the deployment was not successful.
- You can use a bastion host (if you don’t have any other jump server) to get into the Solr VMs and then look into the locations like /var/log/solrInstall.log, /opt/zookeeper/logs to check the status of install using bash scripts
- In an event of something not working, cleaning up those install folders didn’t work in my case. I had to recreate the VMs to ensure a clear reinstall. Since the setting up of the VMs and load balancer is also scripted, it didn’t take much, but I am sure there are better ways to clean a VM and re-installing Solr and Zookeeper.
- The InstallSolr.sh script installs Solr and zookeeper as services, which is different than many other examples you might find over internet, so keep that in mind when changing the script for any additional requirements.
- After successful install, cross check from Solr Admin portal URL that all services are running as expected.
Summary
In summary, I would say setting up SQL and Redis was relatively easy but Solr more than made up for that 🙂 It was fun to learn about Solr configurations, bash scripts etc. I am sure you will have your own share of fun getting these up and running. So, ask me in the comments, if you would like to know more about any specific implementation detail.
In next article of this series, I will try to put down the details about setting up Sitecore in AKS Cluster. I will update the links of those articles in this post as and when those are published. Keep an eye on my LinkedIn posts or Twitter handle for the updates, if interested.
Enjoy,
Anupam