I have written a couple of articles about this topic earlier like this which explains how to monitor the office 365 health status using PowerShell and this one which does the same using Power Automate. But I kept thinking about that both of these solutions are more like “Pull” status. Meaning, we check every 30 minutes and see if there are any new messages in the health center. Not very efficient if you want yourself to be kept updated and take actions quickly.
Why this Article
This article is about following a similar approach as already described in the previous one, but change the Pull (or query) every 30 minutes to Push (or triggered) one. What that means, as n when any new incident happens, our Power Automate will get triggered and send you the same details which we saw in the previous article.
So, the objective has not changed, at the end, you will receive an email with updates about the incident, it’s the trigger which is going to make the difference now.
Before you get started, ensure that the account you are using with Power Automate/Flow at least has a “Flow per user” license assigned, since we’ll be using HTTP Action, which is a premium connector now. If you don’t have a Per User license of Power Automate/Flow, you can achieve the same using PowerShell as well by following this article.
How to go about it
Now that we have established, that it’s just the solution which is going to be different, I encourage you to take a look at the previous article to understand the problem and context better.
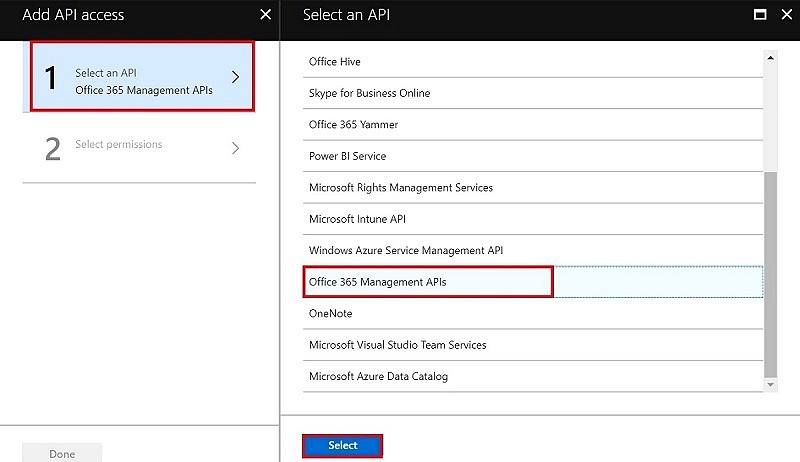
Register App in Azure AD
This section is well explained in the previous article, so I will skip it here. Just follow the steps detailed under the heading “Register App in Azure AD” in my previous article and note down the Tenant ID, Client ID and Client Secret in a notepad.
Solution Outline
Lets outline what we are trying to achieve here.
- Get the Incident published in the Office 365 Health Center for specific applications to trigger our Power Automate
- Find out the latest message of that incident as one Incident may have multiple status messages
- Construct the mail and send to Admins
And what will it take to achieve the above
- Use an unmonitored service/functional account which has a mailbox associated
- Getting an Access Token to call the Office 365 Service Communication API
- A lot of JSON and string manipulations
- Some final tricks to construct the mail output as desired
Configure Notifications
We need to setup to receive mail notifications from with the Health Center configurations. What’s more, you can pick and choose which type of events you want to monitor (Incidents or Advisory) and also, events related to which Application(s). Just click on “Preferences” and select the check box “Send me service health notifications in email”. You can the type in upto 2 email addresses – type in a mail Id which is not not actively monitored, like a service or functional account then select type of events and applications and click Save.
You can of course type in the same email ID on which you want to receive notifications, but in that case you will receive two notifications – one from Microsoft and another from your Power Automate with more details
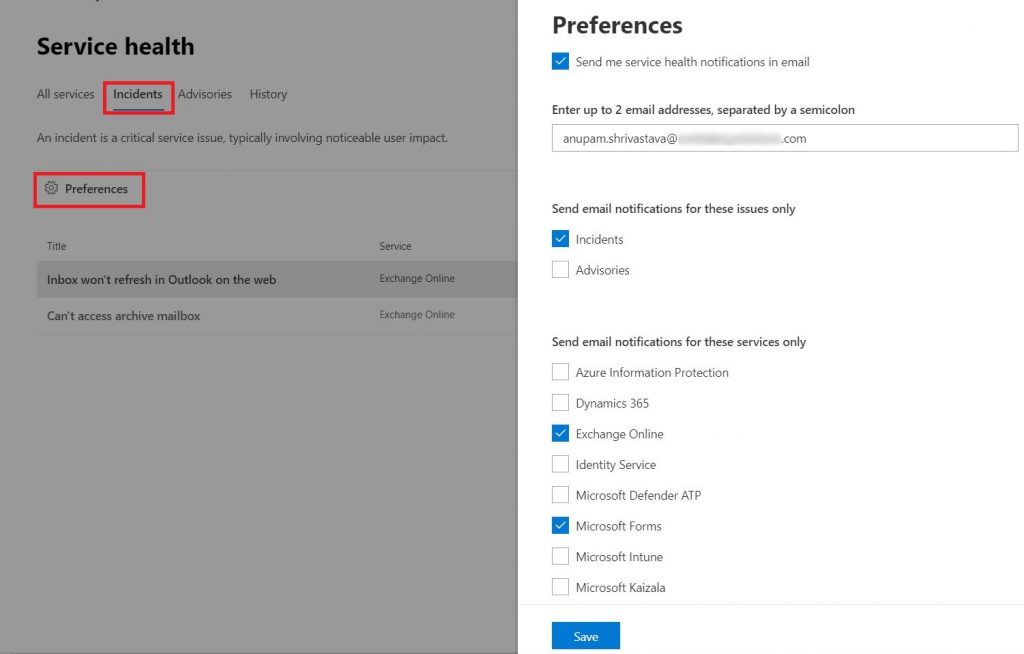
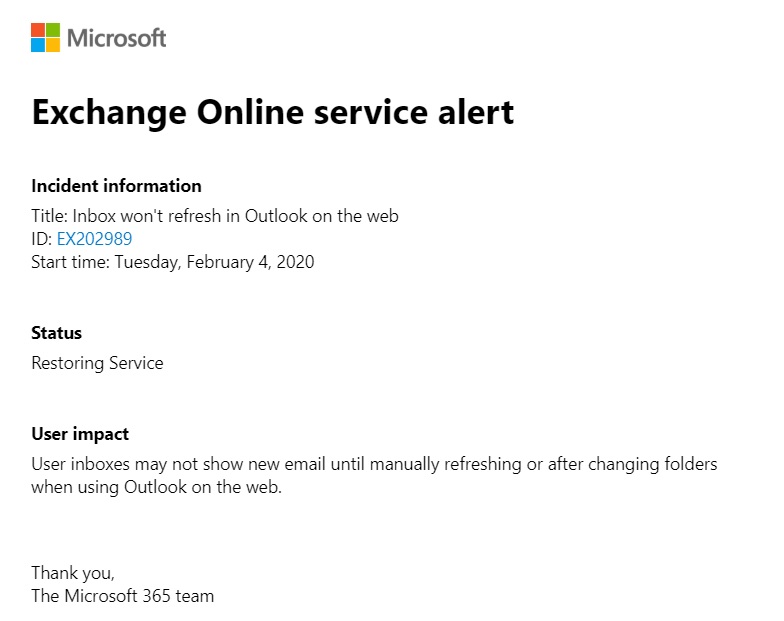
And it’s Done. Next time, MS publishes any new update, you will receive emails in that mailbox. And this is what we are going to use as a trigger for our Power Automate. Neat, isn’t it?
Power Automate
Now that we have the out of the box notification setup, let’s jump into the core of this solution.
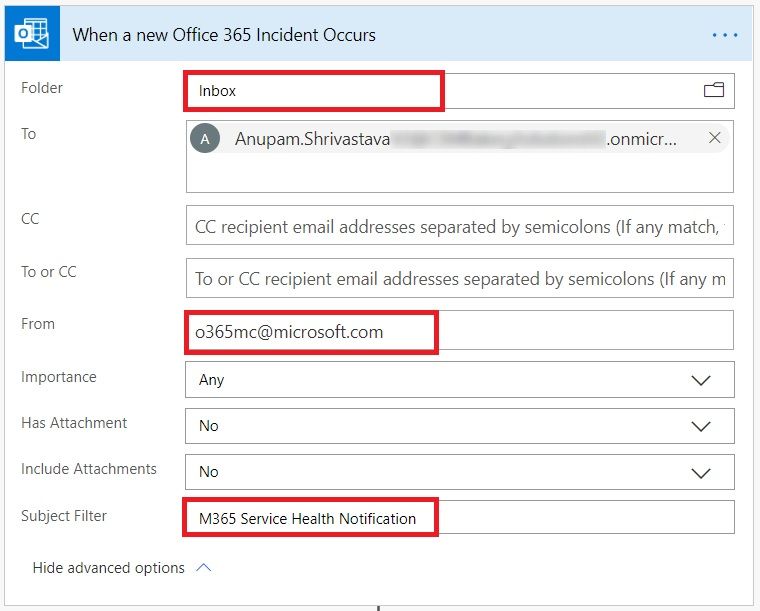
Create a new Power Automate and select the trigger as “When a new email arrives (V3)” from under Office 365 Outlook and configure it as below:
- Make a connection using the account configured to receive notifications in the previous step
- Under Folder: Select Inbox
- Under To: Type in the same email Id which has been configured to receive notifications in previous step
- Under From: Type in [email protected]
- Under Subject Filter: Type in M365 Service Health Notification
Initialize Variables
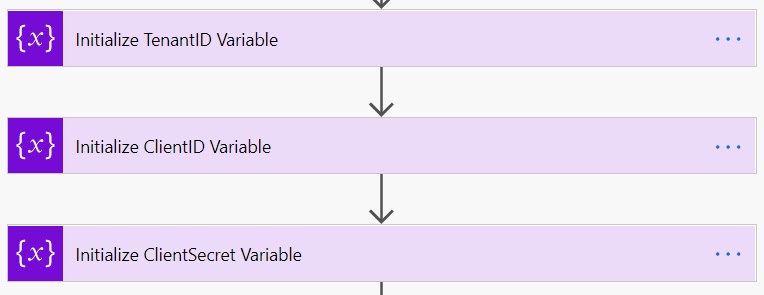
Let’s start with the basics. We need some variables to store values which we need later in other actions. The variable names are self-explanatory and all of these are of string type. Add values to these variables as noted down from the Azure AD App.
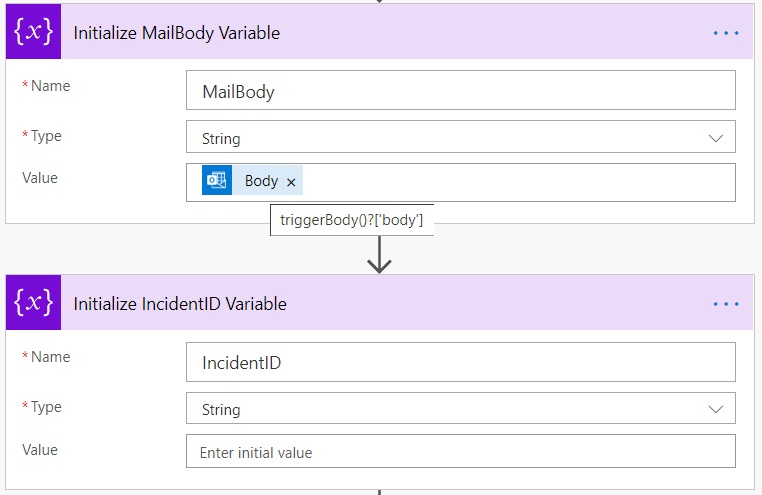
Declare a couple of more string type variable
- MailBody: Add the value as the body of the trigger (“When a new email arrives (V3)”) from under the Dynamic contents
- IncidentID: Leave the value blank. We’ll store the Incident ID extracted from the email in this.
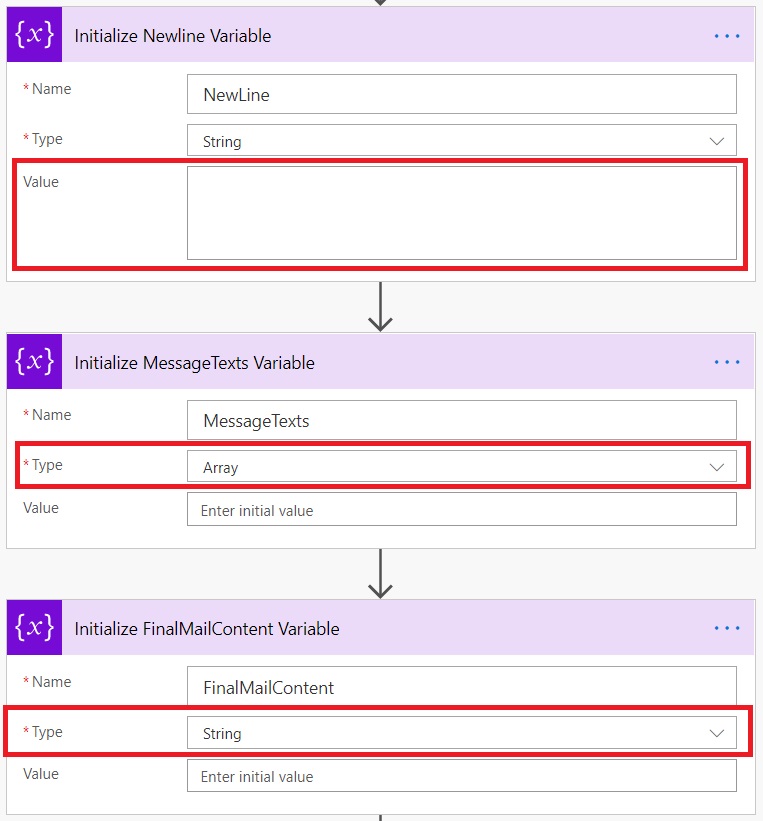
Next, we still need some more variables, but of different types now.
- A string type variable named “NewLine” with value as two new line characters. You just press enter button twice in the value field. You would see the height of the text field will change. I will explain later why it’s required.
- An array type variable named “MessageTexts” with no initial value. This will be required later to format our mail properly.
- And another string type variable named “FinalMailContent” which will hold our final formatted text to be sent over email.
Extract Incident ID from Mail Body
Let’s first find out which Incident we need to get more details about. For that we will find out the Incident ID from the notification mail received.
This is an important and probably most unreliable step, since this depends highly on the mail format. So, if Microsoft decides to change the mail format in future, you will have to revisit this section to update to match the latest format.
To extract the Incident ID from the mail body, we are essentially going to perform just two little actions –
- Convert the mail body from HTML to Text
- Perform a string operation to extract the Incident ID
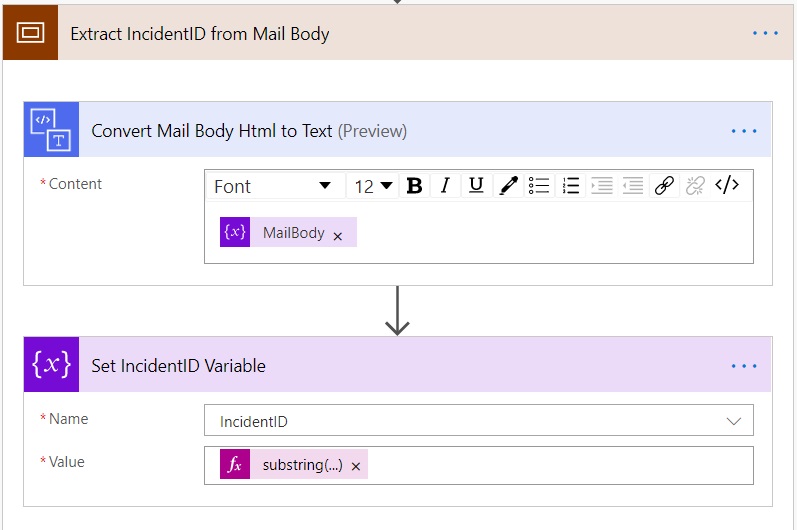
I have put both of these actions under one scope. To convert the incoming mail body to text, just add the action “Html to Text” from under Content Conversion and add the MailBody variable as Content. We already assign the Mail body to this variable earlier.
What this step essentially does is to remove all Html tags from the mail body giving us a clean textual content making is easier to perform string operations.
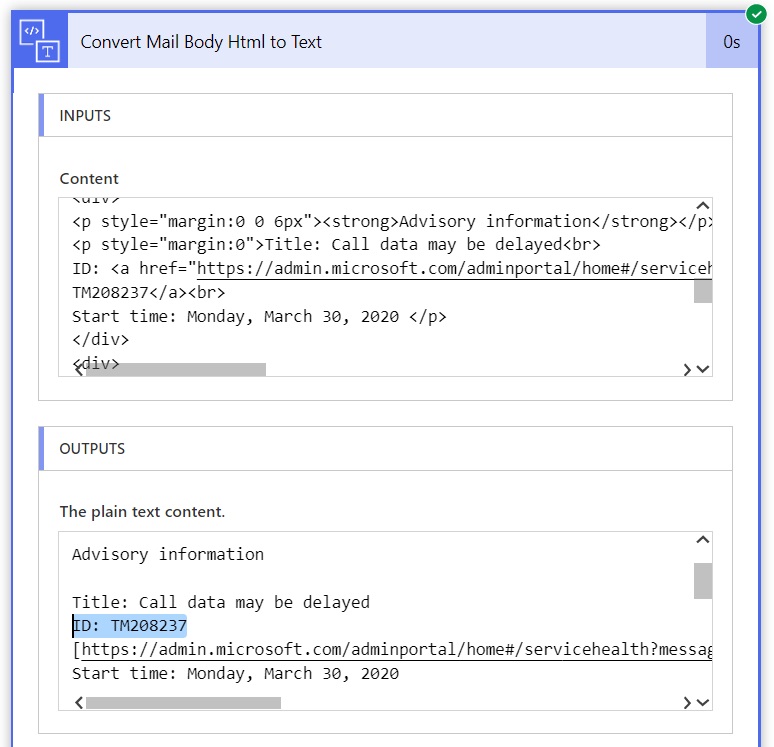
The second string operation is where all the magic happens. As you can see in the screenshot above that ID is coming as an eight character textual value appearing after a text “ID: “.
As on the date of writing this article, the Incident ID is always of 8 characters across all Office 365 services.
What we are going to do is perform some string manipulation to extract the ID.
Add a Set Variable action and select the IncidentID under Name. For value, provide the following under Expression and click OK-
substring(body('Convert_Mail_Body_Html_to_Text'),add(indexOf(body('Convert_Mail_Body_Html_to_Text'),'ID: '),4),8) Let me break it down for you. What we are doing here is finding out the index of the text “ID: ” and extracting a substring starting from 4th character till next 8 characters (length of the actual ID).
If everything goes as expected, you should now be able to see the Incident ID in the output like this.
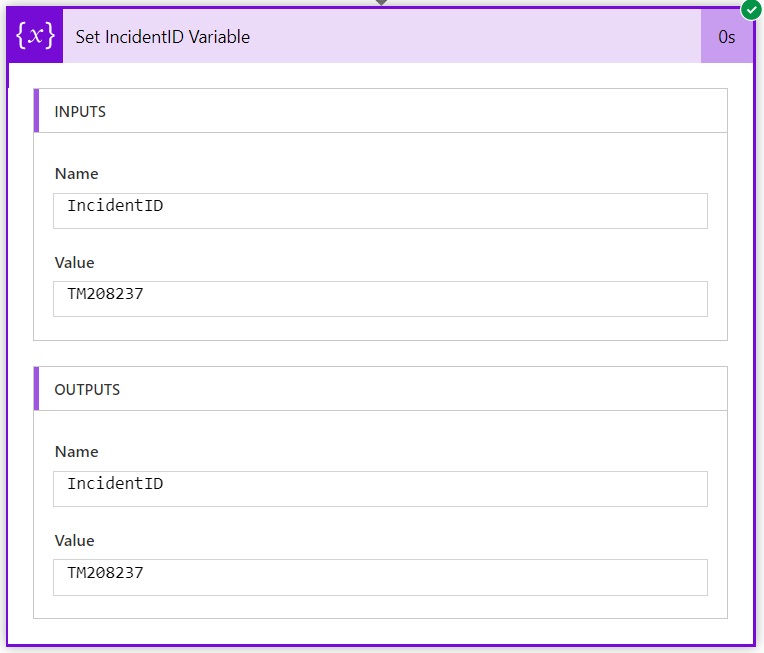
Our battle is half won already, since we are able to get the Incident ID received by our Power Automate by a trigger as soon as the incident was published by Microsoft. All we need to do now, is very similar to what we did in the previous article – Get the Incident, find out the latest message, construct the email and send!
Get Access Token
I am going to reuse some text from my previous article about some steps, as those are exactly the same.
Office 365 Communication API needs OAuth2 Authentication token. So, let’s use our Tenant ID, Client ID and Client Secret noted during Azure AD App configuration.
If you have worked with SharePoint REST Services using .Net/PowerShell, you know that we need to get a bearer token first before we can call any APIs. This is received by passing the Tenant ID, Client ID and Client Secret that we registered earlier in a specific format to a specific endpoint.
We already have Client ID and Client Secret. But in cases where the client secret contains any special characters we need to URL Encode it. I just use https://www.urlencoder.org/ to get the encoded client secret or just use encodeURIComponent expression in Power Automate/Flow. If you don’t do this, you may get an error like “Invalid Client Secret” when the step is executed. So, if your generated client secret came up like BhW/rsym7yD6we8XOGB91DvtqK/NowARtJ4KH/YZ+wo= the value that you should be using as client secret in this step would be BhW%2Frsym7yD6we8XOGB91DvtqK%2FNowARtJ4KH%2FYZ%2Bwo%3D
Now that we have all the inputs lets go ahead and fill the values in the Flow Action. Search and add an HTTP action in the Power Automate/Flow and configure it with following values
- Method: POST
- Uri: https://login.microsoftonline.com/<tenant ID>/oauth2/token?api-version=1.0
- Headers: Content-Type as Key and application/x-www-form-urlencoded as Value
- Body: client_id=<ClientID>&scope=https://graph.microsoft.com/.default&client_secret=<Encoded Client Secret> grant_type=client_credentials&resource=https://manage.office.com
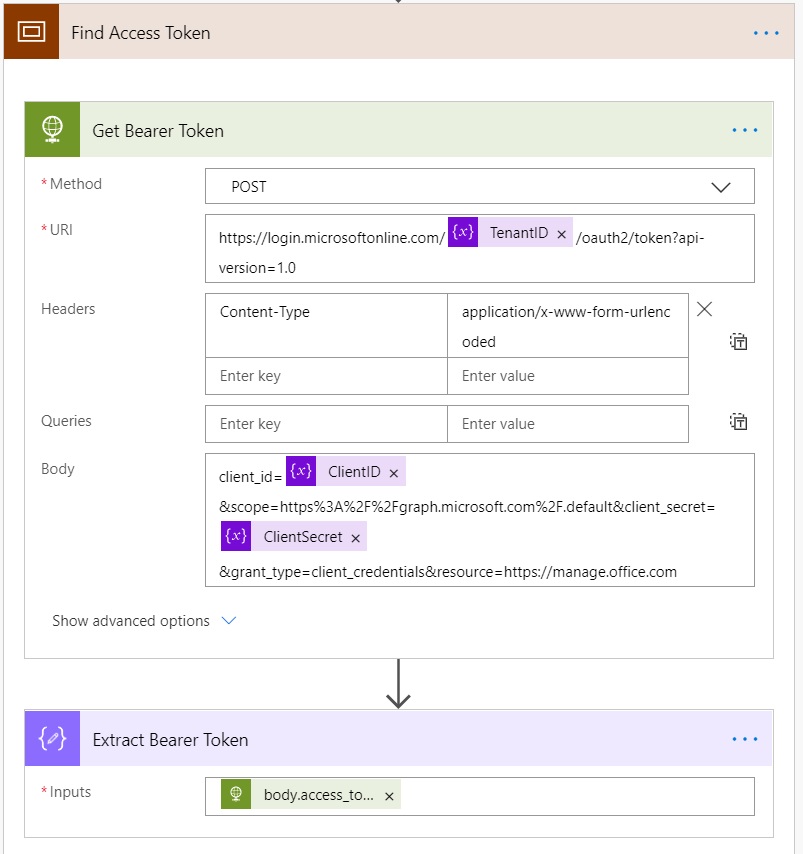
To extract the Access token from the output, add another step by selecting “Data Operations – Compose” from under Actions. It will add another Action and will ask for Input.
Type “@outputs(‘Get_Bearer_Token’).body.access_token” in the input box, including the double quotes.
Here Get_Bearer_Token is the name of the previous action with spaces replaced with underscore (_) character. If you have named your previous action something else, use that name here. Also, always Type this, don’t copy-paste from here otherwise, you might get http 400, bad request error.
At this stage, we have extracted the access token which can be passed to the next action which will make Office 365 Communication Services API call.
Call Office 365 Communication Services API
Add another Action after Compose and select HTTP like the previous step of Get Bearer Token. It will add another HTTP action and we need to prepare for the values to be passed to it.
- Method: GET
- Uri: https://manage.office.com/api/1.0/<Tenant ID>/ServiceComms/Messages?filter=Id eq ‘<IncidentID variable>’
- Headers:
- Accept as Key and application/json as Value
- Authorization as Key and Bearer<space><select output from previous step>
- Body: <Leave Empty>
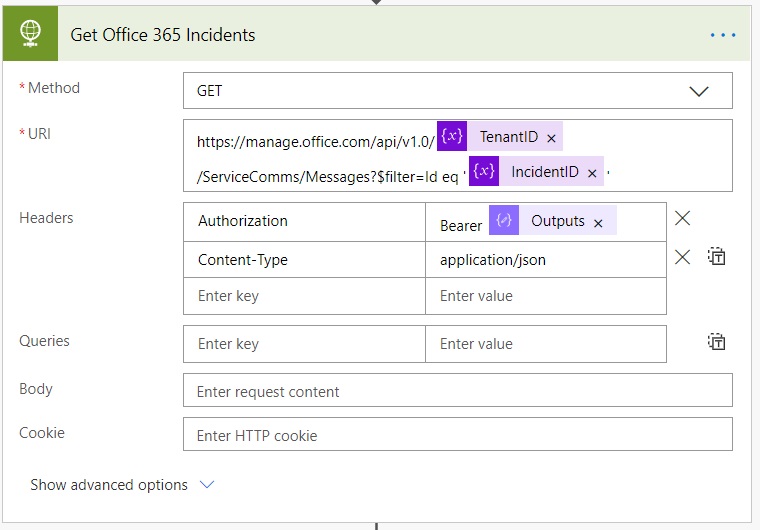
Once this API call succeeds, it will give us the incident associated with the Incident ID.
I the last article I mentioned that I could not make the filter statement work. However, it works now, so I am passing the Incident ID as filter in the URI itself.
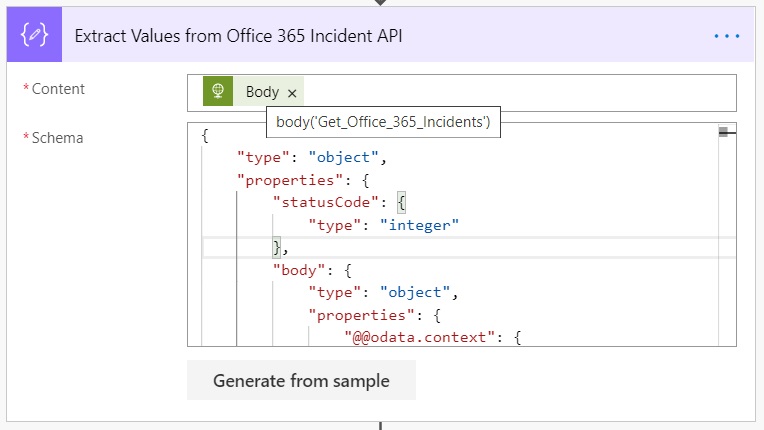
Now, to be able to work with the output of the API call, we need to parse the output in a JSON format removing unnecessary properties. It will also generate the list of those properties and show up under the dynamic content in Power Automate/Flow to be reused easily in next steps.
To do so, just add an Action – Parse JSON. In the newly added action under Content, select Body from the Dynamic content of “Get Office 365 Incidents” and paste the following schema. I have removed many properties already from here, you can remove some more based on your requirements.
{
    "type": "object",
    "properties": {
        "statusCode": {
            "type": "integer"
        },
        "body": {
            "type": "object",
            "properties": {
                "@@odata.context": {
                    "type": "string"
                },
                "value": {
                    "type": "array",
                    "items": {
                        "type": "object",
                        "properties": {
                            "AffectedWorkloadDisplayNames": {
                                "type": "array"
                            },
                            "AffectedWorkloadNames": {
                                "type": "array"
                            },
                            "Status": {
                                "type": "string"
                            },
                            "Workload": {
                                "type": "string"
                            },
                            "WorkloadDisplayName": {
                                "type": "string"
                            },

                            "EndTime": {
                                "type": "string"
                            },
                            "Feature": {
                                "type": "string"
                            },
                            "FeatureDisplayName": {
                                "type": "string"
                            },
                            "Id": {
                                "type": "string"
                            },
                            "ImpactDescription": {
                                "type": "string"
                            },
                            "LastUpdatedTime": {
                                "type": "string"
                            },
                            "MessageType": {
                                "type": "string"
                            },
                            "Messages": {
                                "type": "array",
                                "items": {
                                    "type": "object",
                                    "properties": {
                                        "MessageText": {
                                            "type": "string"
                                        },
                                        "PublishedTime": {
                                            "type": "string"
                                        }
                                    },
                                    "required": [
                                        "MessageText",
                                        "PublishedTime"
                                    ]
                                }
                            },
                            "Severity": {
                                "type": "string"
                            },
                            "StartTime": {
                                "type": "string"
                            },
                            "Title": {
                                "type": "string"
                            },

                            "FeatureName": {}
                        },
                        "required": [
                            "Id",
                            "Title"
                        ]
                    }
                }
            }
        }
    }
}
At this stage, even though we know that output just contains one single incident, we get a collection as the output, so we need to loop through, but the loop with run exactly one time only.
Loop and Find Latest Messages
So, we need to loop through the collection containing a single Incident. Also, each incident may contain multiple status messages published, so we need to find out the latest message to send over email. You guessed correctly, let’s go ahead and add a for each loop action in our solution.
- Loop through the collection containing a single incident
- Find messages for the incident
- Find latest message for the incident
- Extract the message
- Send the extracted message over email
Let’s put a loop on all the filtered Incidents and put the output body of the previous step “Extract Values from Office 365 Incident API”.
I ran into an issue when trying to add the output body from under Dynamic content. Doing so, was showing the added body as body(‘Extract_Values_from_Office_365_Incident_API’)?[‘body]?[‘value’] instead of body(‘Extract_Values_from_Office_365_Incident_API’)?[‘value’] which is the correct one. If you run into the same issue, just add the second value under Expression and press OK.
Now, we need to find out the latest message of the current incident. Messages appear as an array inside the Incident. To do so, we’ll first find out the length of the message (i.e. count).
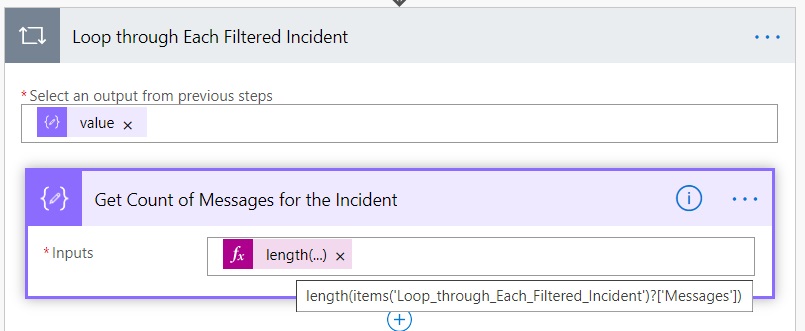
Drop a Compose Action from under Data Operations and provide the input as in the screenshot above – length(items(‘Loop_through_Each_Filtered_Incident’)?[‘Messages’]) by adding this under Expression and clicking OK.
This step will provide us a count of how many messages that particular incident has. Now to extract the latest message drop another Compose Action from under Data Operations and provide this as an input items(‘Loop_through_Each_Filtered_Incident’)?[‘Messages’][sub(outputs(‘Get_Count_of_Messages_for_the_Incident’),1)], again by adding this under Expression and clicking OK.
What essentially we are doing here, is finding out the item at the end of the Array.
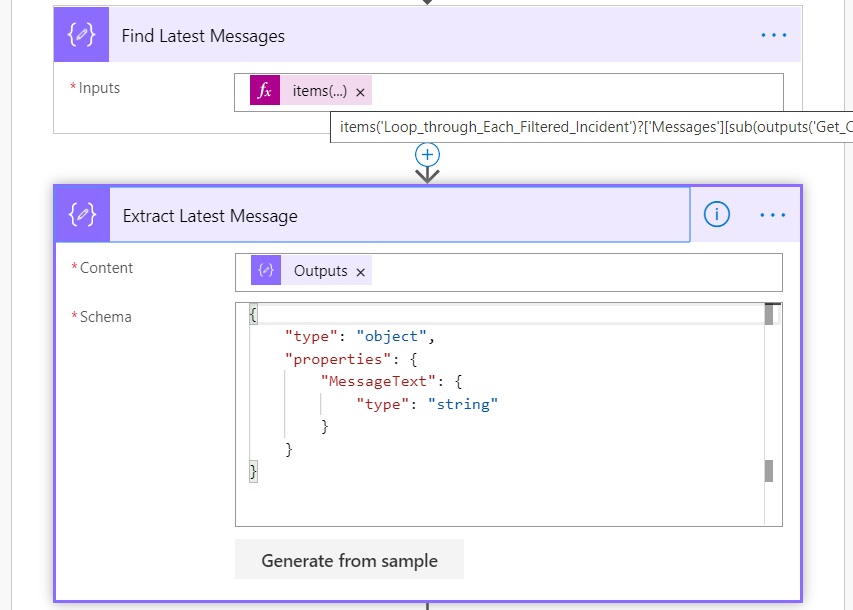
Just add another Parse JSON action to extract the message. Provide Outputs of the step “Find Latest Message” under Content and the below as schema
{
    "type": "object",
    "properties": {
        "MessageText": {
            "type": "string"
        }
    }
}
If everything goes as planned, the outcome of this step would be something like this
{
  "MessageText": "Title: New and changed query rules used within search queries are slow to take effect\n\nUser Impact: Users may not see best bets or promoted content for up to 24 hours after a query rules change is made.\n\nMore info: Previously defined query rules do work as expected during the 24 hour propagation delay. There is no effect on freshness of document.\n\nCurrent status: We've validated that the short term fix, which reduces the refresh time to one hour, provides the intended relief within our test environment. We're preparing to deploy this fix to the affected infrastructure and expect that the deployment will take approximately one week to complete. Users may begin to experience relief as the fix propagates throughout the environment. Additionally, we're continuing to investigate the root cause and establish a fix to remediate impact fully.\n\nScope of impact: This issue may affect any user utilizing SharePoint Online search.\n\nNext update by: Wednesday, February 26, 2020, at 2:00 PM UTC",
  "PublishedTime": "2020-02-21T12:23:56.657Z"
}
As you can see, this is a single message containing all required information with two new line characters (“\n\n”) at end of each section like Message Text, User Impact etc.
So, you might be inclined (as I was) to just add a Send Mail V2 action and send the message over email. However, even after multiple tries, I could not make the Send Mail V2 action to respect these new line characters and mails would arrive like this.
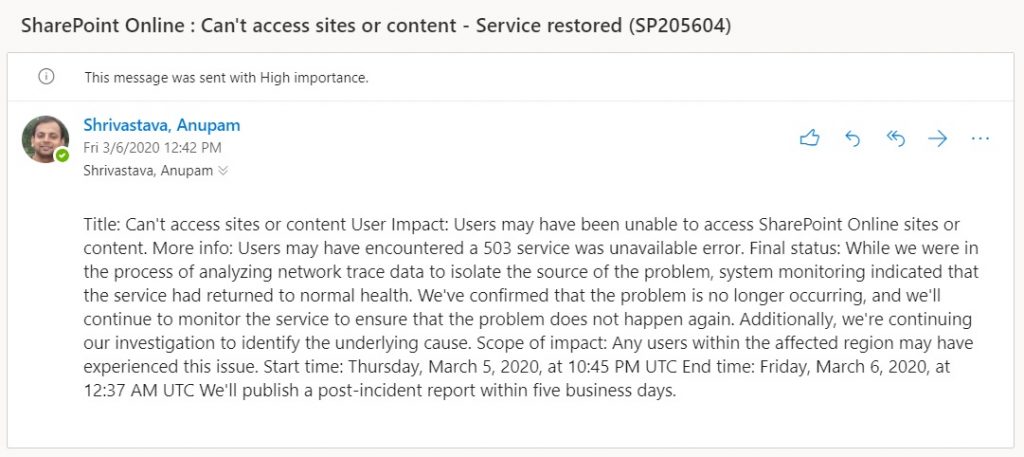
Not so neat, huh!
So, I had to improvise. Remember the MessageText Array variable that we declared at the start? Let’s make use of it.
What we are going to do
- Split the messages into different items in array whenever “\n\n” is encountered
- Add those items in the MessageText Array
- Loop through the Array and construct the whole message again, putting some html code like <br> in between.
- Send the final constructed html message over email
Let’s get started then.
Add a set variable action and select “MessageText” variable. In the value, provide the following formula split(body(‘Extract_Latest_Message’)?[‘MessageText’],variables(‘NewLine’))
Where the variables(‘NewLine’) contains the two new line characters which we declared at the beginning.
Now that we have the Message as different items in the MessageText array, let’s put a for each loop and iterate on it.
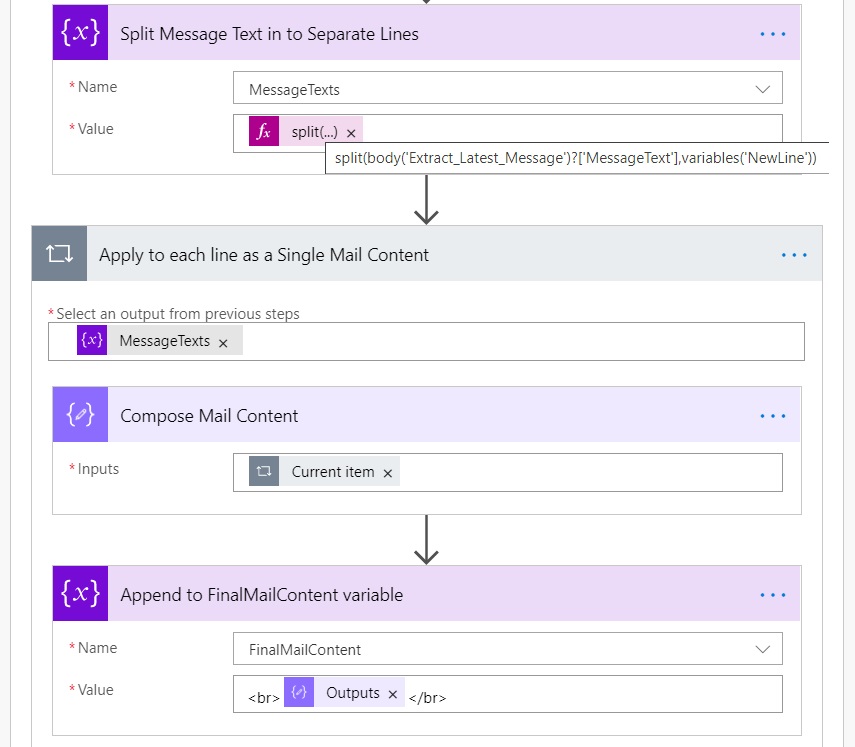
I also dropped in another Compose action for each of use to get the current item. And then add an “Append to string Variable” action and select “FinalMailContent” under name and put <br>output of previous step</br> under value.
This will ensure that a html line break in inserted where the new line characters were there earlier. So, this loop on one message prepares one complete message to be sent over email with proper line breaks. You can ofcourse add any other html tags to highlight any specific lines if you want.
And now we have the final mail which can be sent over.
Just add your favorite Send mail V2 action and provide the mail IDs. Under subject, you can select WorkloadDisplayName : Title – Status (Id). To do so, you can just add the
@{items('Loop_through_Each_Filtered_Incident')?['WorkloadDisplayName']} : @{items('Loop_through_Each_Filtered_Incident')['Title']} - @{items('Loop_through_Each_Filtered_Incident')?['Status']}
(@{items('Loop_through_Each_Filtered_Incident')?['Id']}) 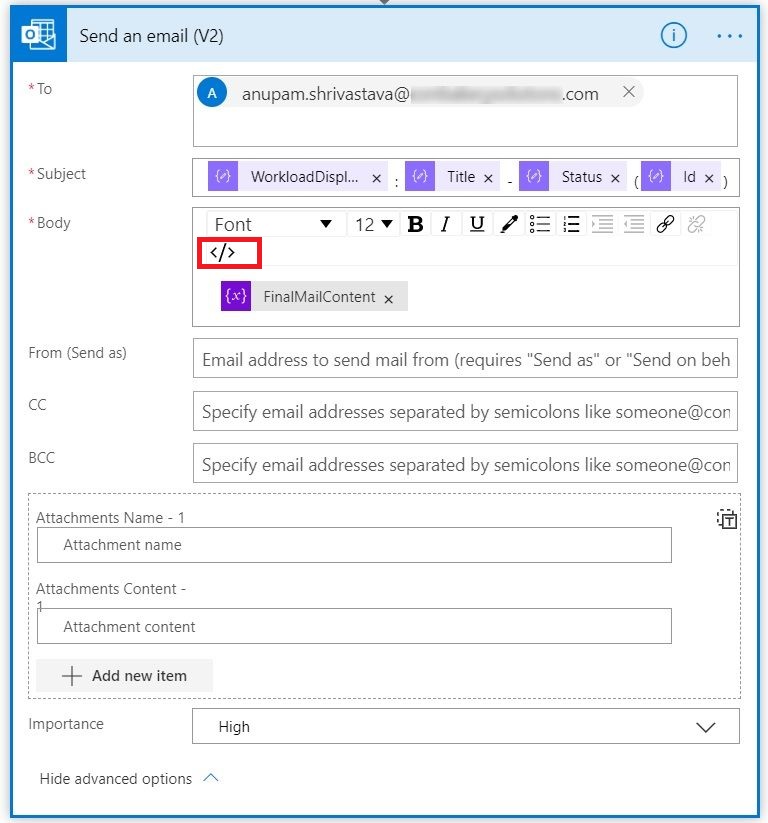
And select the FinalMailContent variable in the body. If you want you can change the Importance to “High” from under advanced options.
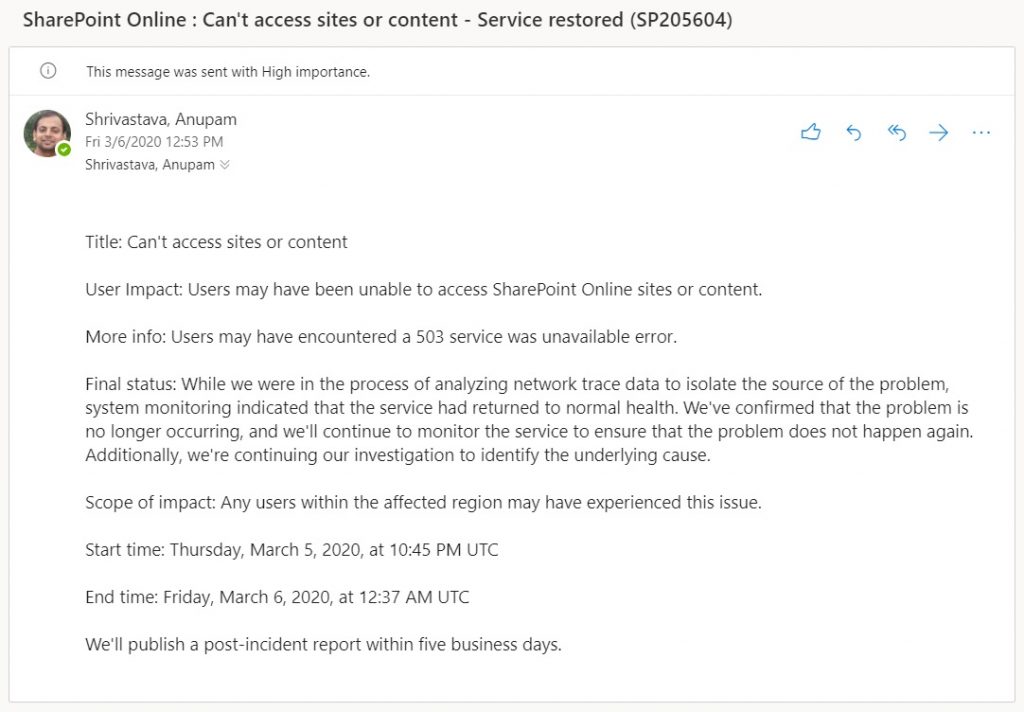
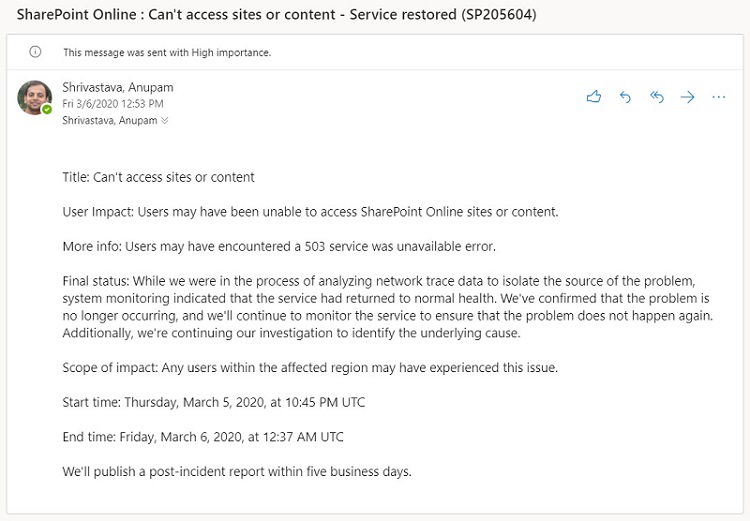
And finally we are done. Just schedule it to run for every 30 mins and enjoy the notifications like this.
Hope this helps.
Enjoy,
Anupam
5 comments
Hi, I’m stuck with this flow. When I try to extract the Access token from the output I get the error 400 – BAD REQUEST on the Get Bearer Token action. {“error”:”invalid_request”,”error_description”:”AADSTS900144: The request body must contain the following parameter: ‘grant_type’.\r\n
My clientsecret is encoded (didn’t change anything)
client_id=@{variables(‘ClientID’)}&scope=https://graph.microsoft.com/.default&client_secret=@{variables(‘ClientSecret’)}grant_type=client_credentials&resource=https://manage.office.com
Any ideas how to resolve that?
I see, you are missing “&” sign before grantType.
This is great, thank you for putting this together. I’m getting stuck at the “Split_Message_Text_in_to_Separate_Lines’ section, I keep receiving the error below.
InvalidTemplate. Unable to process template language expressions in action ‘Split_Message_Text_in_to_Separate_Lines’ inputs at line ‘1’ and column ‘11590’: ‘The template language expression ‘split(body(‘Extract_Latest_Message’)?[‘MessageText’],variables(‘NewLine’))’ cannot be evaluated because property ‘MessageText’ cannot be selected. Array elements can only be selected using an integer index. Please see https://aka.ms/logicexpressions for usage details.’.
Would really appreciate some guidance on how to get past this, thanks!
“MessageText” here is NOT the variable, we declare at the top… That is “MessageTexts”. At the step “Extract Latest Message”, we are using a JSON schema
{

    "type": "object",

    "properties": {

        "MessageText": {

            "type": "string"

        }

    }

}
The output of this contains “MessageText” as a string.
Also, ensure you type in any single and double quotes used in the article, rather than copy paste. I have seen that causing issues to a few others.
Thank you, Anupam, for this wonderful and easy tutorial on how to build your own Service Monitoring mechanism. I’ve been using this for the last few months to great effect.
I’m quite sure that you’ve heard about the changes Microsoft is making to theirService Communications API, wherein they’re moving it from the current Management APIs to the Graph. I was wondering if it would require major changes to this Flow or just the authentication part needs changing. Thanks.