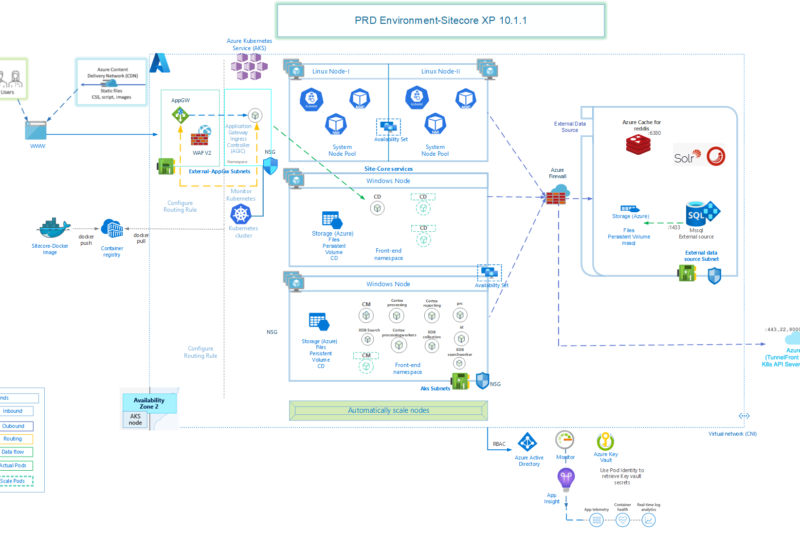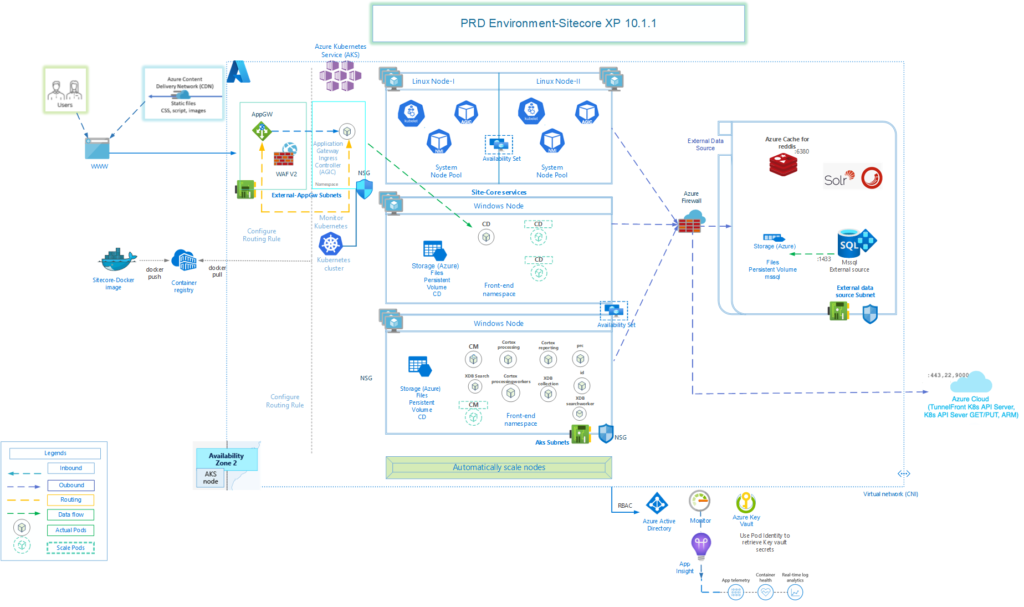
This is the third article of the series Sitecore Production Environment on Azure Kubernetes Services – Series in which I intend to explain the Sitecore installation and configuration on Azure Kubernetes Services. If you want to know more about other Azure Components, check out the Part 1 of this series or about External Data Sources, check out Part 2 of this series.
Problem Statement
If you have followed this series so far, then we already have details about setting up all Azure required components and external data sources for Sitecore by now. It’s time to focus on actual installation and configuration of Sitecore itself.
Installation Guide for Production Environment with Kubernetes provides detailed steps about how to prepare and perform the installations, but I would like to highlight some of the additional steps which might be required in a production setup. This includes the following mainly:
- Preparing and deploying Secrets to Azure Key vault
- Preparing TLS/HTTPS Certificates
- Preparing Sitecore Overlays files
- Exposing Sitecore using Azure Application Gateway Ingress Controller
How to go about it
You can start following the Sitecore installation guide to get started. Prepare your machine with required client software, download all scripts and PowerShell modules required etc. Once all the scripts are in place and required Identity signing certificate has been generated, Sitecore license compressed, it’s time to look into what we need to do different from that installation guide.
Preparing and deploying Secrets to Azure Key vault
Rob has an excellent article about this topic. I have reused the scripts provided by him with an updated function to regenerate random passwords. This was required as some of the passwords generated by Rob’s scripts were not complex enough for SQL and SQL Init was failing due to that.
# generates a random alphanumeric string of the given length
Function Get-RandomAlphanumericString {

	[CmdletBinding()]
	Param (
        [int] $length = 8
	)

	Begin {
	}

	Process {
        #Write-Output ( -join ((0x30..0x39) + ( 0x41..0x5A) +  (0x23..0x26) + (0x61..0x7A) | Get-Random -Count $length  | % {[char]$_}) )
       # (-join(65..90|%{[char]$_}|Get-Random -C 4))  + (-join(64,33,43,126|%{[char]$_}|Get-Random -C 2)) +  (-join(97..122|%{[char]$_}|Get-Random -C 4))  + (-join(49..57|%{[char]$_}|Get-Random -C 2)) + (-join(65..90|%{[char]$_}|Get-Random -C 3)) + (-join(97..122|%{[char]$_}|Get-Random -C 2)) + (-join(49..57|%{[char]$_}|Get-Random -C 2)) + (-join(64,33,42,126|%{[char]$_}|Get-Random -C 1))
	    $pw = ""
         while(!(($pw.Contains('@')) -or  ($pw.Contains('*')) -or ($pw.Contains('!')) -or ($pw.Contains('~'))))
        {
            $pw = ( -join ((0x30..0x39) + ( 0x41..0x5A) +  (0x40) +  (0x21) +  (0x2a) +  (0x7e)  + (0x61..0x7A) | Get-Random -Count $length  | % {[char]$_}) )
        }
        Write-Output $pw
    }
}
You can find/develop a better script to do the same, but in my case this was enough, as it generated complex enough random passwords combining large caps, small caps and special characters while skipping the characters SQL doesn’t like in passwords.
Preparing TLS/HTTPS Certificates
This steps is going to be completely different than what’s explained in the Sitecore Installation Guide. The Installation guide provides the steps to create self-signed certificates with default names like cd.globalhost, cm.globalhost etc. However in any production environment, a certificate is required which matches the domain names to be used in your environment and we can’t use self-signed certificates.
So, to do so, you need to generate a CSR file with the domain names you would like to use. For example, if your hosted Sitecore site is going to be accessible as www.yourcompany.com, you should create a CSR file with SAN fields entries as www.yourcompany.com, cm.yourcompany.com and id.yourcompany.com. The other two domains are for the Sitecore admin center and Identity provider. You can choose some other domains as well for them if you want.
Once you receive the certificate, say in PFX format, that can be kept in the Azure Keyvault. Now to get the certificate in the required format, we need follow these steps:
- Sitecore expects the tls certificates in specific formats (.crt and .key), which are not supported by Azure keyvault, so we’ll keep the tls files somewhere else like in Azure Devops repository.
- Download the PFX files from under Certificates from Azure Keyvault
- To extract crt and key files, we use openssl commands. Sitecore expects the key file in Unencrypted format
$PFXFilePath = "<local path>\yourcompanycert.pfx"
$CRTFilePath = "<local path>\tls.crt"
$EncryptedKeyFilePath = "<local path>\Etls.key"
$DecreyptedKeyFilePath = "<local path>\tls.key"

cd c:
cd "C:\Program Files\Git\usr\bin\"

.\openssl.exe pkcs12 -in $PFXFilePath -nocerts -out $EncryptedKeyFilePath
.\openssl.exe pkcs12 -in $PFXFilePath -clcerts -nokeys -out $CRTFilePath
.\openssl.exe rsa -in $EncryptedKeyFilePath -out $DecreyptedKeyFilePath
Copy the generated files in Azure Devops repo, under corresponding folder.
/Sitecore/Overlays/Secrets/tls/global-cd/
/Sitecore/Overlays/Secrets/tls/global-cm/
/Sitecore/Overlays/Secrets/tls/global-id/
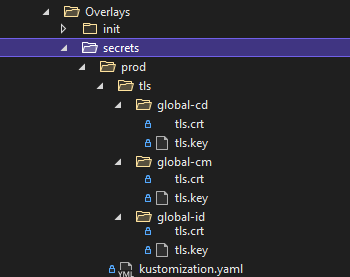
And update the kustomization.yaml file created at the tls folder level to refer to these files
apiVersion: kustomize.config.k8s.io/v1beta1
kind: Kustomization
generatorOptions:
  disableNameSuffixHash: true
secretGenerator:
- name: global-cd-tls-prod
  files:
    - tls/global-cd/tls.key
    - tls/global-cd/tls.crt
  type: kubernetes.io/tls
- name: global-cm-tls-prod
  files:
    - tls/global-cm/tls.key
    - tls/global-cm/tls.crt
  type: kubernetes.io/tls
- name: global-id-tls-prod
  files:
    - tls/global-id/tls.key
    - tls/global-id/tls.crt
  type: kubernetes.io/tls
I know, we have not talked about “Overlays” yet. We’ll take a look in the next section about preparing Sitecore overlays files and how to use them. That should clarify what we just did about the TLS files.
Preparing Sitecore Overlays Files
Now, this is something that neither the official Sitecore installation guide nor Rob’s articles talk about. But this very important for any production environment setup.
So, what are Overlays? Essentially, these are additional Sitecore Kubernetes Specifications which we should use on top of what we get from Sitecore (think something like high availability, scaling etc.) or if we want to change something in the default Sitecore specification files provided by Sitecore (think something like refer to our ACR to get images instead of Sitecore public registry).
As a practice, I prefer not to modify default Sitecore Kubernetes specification files directly and if we need to make any changes, do those changes in the associated overlays file(s).
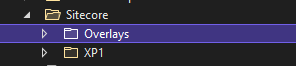
So, where should we create Overlays files? You can create a folder names “Overlays” in parallel to your XP1 folder which is essentially the SItecore Kubernetes files downloaded from Sitecore.
The way it works, when deploying to AKS, we deploy the Overlays files which get combined with the original specification files. Let’s look at an example of cd.yaml.
In my case, I wanted to run the cd container on specific Node where no other containers should be running, so that it can scale on it’s own when there are more users accessing the Sitecore website. So, I added a new file named cd.yaml with NodeType tag. This tag gets the value from Azure Devops variable in this case, but you can hardcode, if you want.
Similarly look at the other tags like requests and limits, these are the tags which I wanted to pass new values to overwrite the values provided in default Sitecore Kubernetes specification file.
apiVersion: apps/v1
kind: Deployment
metadata:
  name: cd
spec:
  selector:
    matchLabels:
      app: cd
  template:
    spec:
      nodeSelector:
      #Update the nodepool name here
        NodeType: $(CD-NODEPOOL)
      containers:
      - name: sitecore-xp1-cd
        image: sitecore-xp1-cd

        env:
        - name: Sitecore_ConnectionStrings_Redis.Sessions
          value: $(sitecore-redis-connection-string)
        resources:
          requests:
            memory: $(CD-MEMORY-REQUESTS)
            cpu: $(CD-CPU-REQUESTS)
          limits:
            memory: $(CD-MEMORY-LIMITS)
            cpu: $(CD-CPU-LIMITS)
Another requirement was to add some high availability and scaling related configurations. Since, these tags don’t exist on default Sitecore specification files, I added a new file named “cd-hpa.yaml” with the following content.
apiVersion: autoscaling/v2beta2
kind: HorizontalPodAutoscaler
metadata:
  name: cd-hpa
spec:
  minReplicas: $(CD-MINREPLICAS)
  maxReplicas: $(CD-MAXREPLICAS)
  scaleTargetRef:
    apiVersion: apps/v1
    kind: Deployment
    name: cd
  metrics:
  - type: Resource
    resource:
      name: cpu
      target:
        type: Utilization
        averageUtilization: $(CD-TARGETCPU)
  behavior:
    scaleDown:
      stabilizationWindowSeconds: 500
This specifies how many minimum/maxiumim replicas we want to run and the conditions to scale.
The difference between these two files – one overwrites the existing tags in the default cd.yaml and another adds additional tags.
And to combine these files with the default cd.yaml, we add a kustomization.yaml and add following:
apiVersion: kustomize.config.k8s.io/v1beta1
kind: Kustomization
bases:
- ../xp1
patchesStrategicMerge:
- cd.yaml
resources:
- cd-hpa.yaml

images:
- name: sitecore-xp1-cd
  newName: yourprivateacr.azurecr.io/sitecore-xp1-cd
  newTag: 10.1.1-ltsc2019
It’s clear what this is doing, with “patchesStrategicMerge”, it merges the tags and overwrites the content and “resources” adds the tags from the file.
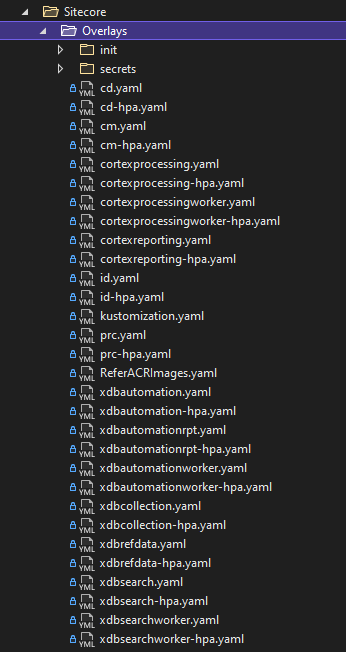
I guess, you get the idea, anywhere you have a requirement to modify the specification files, better use Overlays. This is how my Overlays folder looks like:
And now, when we need to deploy the specifications, we just deploy the overlays, since it already is aware of the base files it needs to merge with.
Exposing Sitecore using Azure Application Gateway Ingress Controller
Here again, the Sitecore installation guide uses NGinX, but in this series we have uses Azure Application Gateway. So, let’s take a look at how we can configure AGIC to expose the Sitecore website.
When we use AGIX with AKS, AKS manages the Application Gateway completely, so DO NOT change anything manually by going to Azure Application Gateway.
All we need to do is to prepare a yaml file with all the instructions and deploy that in AKS. AKS will take care of creating all front-end, back-end pools, certificates associations etc.
apiVersion: networking.k8s.io/v1beta1
kind: Ingress
metadata:
  name: sitecore-ingress
  namespace: sitecore-prod
  annotations:
    kubernetes.io/ingress.class: azure/application-gateway
    appgw.ingress.kubernetes.io/ssl-redirect: "true"
    appgw.ingress.kubernetes.io/connection-draining: "true"
    appgw.ingress.kubernetes.io/connection-draining-timeout: "600"
    appgw.ingress.kubernetes.io/cookie-based-affinity: "true"
    appgw.ingress.kubernetes.io/request-timeout: "600"

spec:
  rules:
  - host: www.yourcompany.com
    http:
      paths:
      - path: /
        backend:
          serviceName: cd
          servicePort: 80
  - host: cm.yourcompany.com
    http:
      paths:
      - path: /
        backend:
          serviceName: cm
          servicePort: 80
  - host: id.yourcompany.com
    http:
      paths:
      - path: /
        backend:
          serviceName: id
          servicePort: 80
  tls:
  - secretName: global-cd-tls-prod
    hosts:
    - www.yourcompany.com
  - secretName: global-cm-tls-prod
    hosts:
    - cm.yourcompany.com
  - secretName: global-id-tls-prod
    hosts:
    - id.yourcompany.com
Take a look at the Application Gateway Ingress Controller tutorial and also about more annotations that can be used in this file.
Once this configuration gets deployed, you could see in an Ingress resource created within AKS and your Application gateway now listening on the host names provided.
Summary
As mentioned in the starting, the Sitecore official installation document provides great step-by-step guidance on how to install Sitecore in AKS. That combined with Rob’s scripts makes it even easier. Now, if you combine those with the details provided in this article, it will help fill the gaps and take care of the considerations which are usually relevant for any production environment.
In the next and final article of this series, I would explain how we can put all these steps together in Azure Devops pipelines to automate almost all the steps involved.
Enjoy,
Anupam